• 0 Posts
  • 58 Comments
Joined 2 years ago
cake
Cake day: June 12th, 2023

help-circle


  • Not the person you replied to, but I’m in agreement with them. I did tech hiring for some years for junior roles, and it was quite common to see applicants with a complete alphabet soup of certifications. More often than not, these cert-heavy applicants would show a complete lack of ability to apply that knowledge. For example they might have a network cert of some kind, yet were unable to competently answer a basic hypothetical like “what steps would you take to diagnose a network connection issue?” I suspect a lot of these applicants crammed for their many certifications, memorized known answers to typical questions, but never actually made any effort to put the knowledge to work. There’s nothing inherently wrong with certifications, but from past experience I’m always wary when I see a CV that’s heavy on certs but light on experience (which could be work experience or school or personal projects).


  • However, it’s worth mentioning that WireGuard is UDP only.

    That’s a very good point, which I completely overlooked.

    If you want something that “just works” under all conditions, then you’re looking at OpenVPN. Bonus, if you want to marginally improve the chance that everything just works, even in the most restrictive places (like hotel wifi), have your VPN used port 443 for TCP and 53 for UDP. These are the most heavily used ports for web and DNS. Meaning you VPN traffic will just “blend in” with normal internet noise (disclaimer: yes, deep packet inspection exists, but rustic hotel wifi’s aren’t going to be using it ;)

    Also good advice. In my case the VPN runs on my home server, there are no UDP restrictions of any kind on my home network and WireGuard is great in that scenario. For a mobile VPN solution where the network is not under your control and could be locked down in any number of ways, you’re definitely right that OpenVPN will be much more reliable when configured as you suggest.


  • I use WireGuard personally. OpenVPN has been around a long time, and is very configurable. That can be a benefit if you need some specific configuration, but it can also mean more opportunities to configure your connection in a less-secure way (e.g. selecting on older, less strong encryption algorithm). WireGuard is much newer and supports fewer options. For example it only does one encryption algorithm, but it’s one of the latest and most secure. WireGuard also tends to have faster transfer speeds, I believe because many of OpenVPN’s design choices were made long ago. Those design choices made sense for the processors available at the time, but simply aren’t as performant on modern multi core CPUs. WireGuard’s more recent design does a better job of taking advantage of modern processors so it tends to win speed benchmarks by a significant margin. That’s the primary reason I went with WireGuard.

    In terms of vulnerabilities, it’s tough to say which is better. OpenVPN has the longer track record of course, but its code base is an order of magnitude larger than WireGuard’s. More eyes have been looking at OpenVPN’s code for more time, but there’s more than 10x more OpenVPN code to look at. My personal feeling is that a leaner codebase is generally better for security, simply because there’s fewer lines of code in which vulnerabilities can lurk.

    If you do opt for OpenVPN, I believe UDP is generally better for performance. TCP support is mainly there for scenarios where UDP is blocked, or on dodgy connections where TCP’s more proactive handling of dropped packets can reduce the time before a lost packet gets retransmitted.


  • OpenAI on that enshittification speedrun any% no-glitch!

    Honestly though, they’re skipping right past the “be good to users to get them to lock in” step. They can’t even use the platform capitalism playbook because it costs too much to run AI platforms. Shit is egregiously expensive and doesn’t deliver sufficient return to justify the cost. At this point I’m ~80% certain that AI is going to be a dead tech fad by the end of this decade because the economics just don’t work now that the free money era has ended.


  • Tl;Dr the protocol requires there to be trusted token providers that issue the tokens. Who do you suppose are the trusted providers in the Google and Apple implementations? Google and Apple respectively, of course. Maybe eventually there would be some other large incumbents that these implementers choose to bless with token granting right. By its nature the protocol centralizes power on the web, which would disadvantage startups and smaller players.


  • I think you’re referring to FlareSolverr. If so, I’m not aware of a direct replacement.

    Main issue is it’s heavy on resources (I have an rpi4b)

    FlareSolverr does add some memory overhead, but otherwise it’s fairly lightweight. On my system FlareSolverr has been up for 8 days and is using ~300MB:

    NAME           CPU %     MEM USAGE
    flaresolverr   0.01%     310.3MiB
    

    Note that any CPU usage introduced by FlareSolverr is unavoidable because that’s how CloudFlare protection works. CloudFlare creates a workload in the client browser that should be trivial if you’re making a single request, but brings your system to a crawl if you’re trying to send many requests, e.g. DDOSing or scraping. You need to execute that browser-based work somewhere to get past those CloudFlare checks.

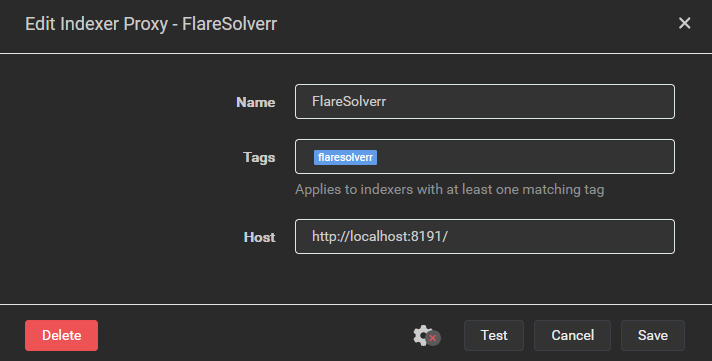
    If hosting the FlareSolverr container on your rpi4b would put it under memory or CPU pressure, you could run the docker container on a different system. When setting up Flaresolverr in Prowlarr you create an indexer proxy with a tag. Any indexer with that tag sends their requests through the proxy instead of sending them directly to the tracker site. When Flaresolverr is running in a local Docker container the address for the proxy is localhost, e.g.:

    If you run Flaresolverr’s Docker container on another system that’s accessible to your rpi4b, you could create an indexer proxy whose Host is “http://<other_system_IP>:8191”. Keep security in mind when doing this, if you’ve got a VPN connection on your rpi4b with split tunneling enabled (i.e. connections to local network resources are allowed when the tunnel is up) then this setup would allow requests to these indexers to escape the VPN tunnel.

    On a side note, I’d strongly recommend trying out a Docker-based setup. Aside from Flaresolverr, I ran my servarr setup without containers for years and that was fine, but moving over to Docker made the configuration a lot easier. Before Docker I had a complex set of firewall rules to allow traffic to my local network and my VPN server, but drop any other traffic that wasn’t using the VPN tunnel. All the firewall complexity has now been replaced with a gluetun container, which is much easier to manage and probably more secure. You don’t have to switch to Docker-based all in go, you can run hybrid if need be.

    If you really don’t want to use Docker then you could attempt to install from source on the rpi4b. Be advised that you’re absolutely going offroad if you do this as it’s not officially supported by the FlareSolverr devs. It requires install an ARM-based Chromium browser, then setting some environment variables so that FlareSolverr uses that browser instead of trying to download its own. Exact steps are documented in this GitHub comment. I haven’t tested these steps, so YMMV. Honestly, I think this is a bad idea because the full browser will almost certainly require more memory. The browser included in the FlareSolverr container is stripped down to the bare minimum required to pass the CloudFlare checks.

    If you’re just strongly opposed to Docker for whatever reason then I think your best bet would be to combine the two approaches above. Host the FlareSolverr proxy on an x86-based system so you can install from source using the officially supported steps.


  • It’s likely CentOS 7.9, which was released in Nov. 2020 and shipped with kernel version 3.10.0-1160. It’s not completely ridiculous for a one year old POS systems to have a four year old OS. Design for those systems probably started a few years ago, when CentOS 7.9 was relatively recent. For an embedded system the bias would have been toward an established and mature OS, and CentOS 8.x was likely considered “too new” at the time they were speccing these systems. Remotely upgrading between major releases would not be advisable in an embedded system. The RHEL/CentOS in-place upgrade story is… not great. There was zero support for in-place upgrade until RHEL/CentOS 7, and it’s still considered “at your own risk” (source).


  • Anything that pushes the CPUs significantly can cause instability in affected parts. I think there are at least two separate issues Intel is facing:

    • Voltage irregularities causing instability. These could potentially be fixed by the microcode update Intel will be shipping in mid-August.
    • Oxidation of CPU vias. This issue cannot be fixed by any update, any affected part has corrosion inside the CPU die and only replacement would resolve the issue.

    Intel’s messaging around this problem has been very slanted towards talking as little as possible about the oxidation issue. Their initial Intel community post was very carefully worded to make it sound like voltage irregularity was the root cause, but careful reading of their statement reveals that it could be interpreted as only saying that instability is a root cause. They buried the admission that there is an oxidation issue in a Reddit comment, of all things. All they’ve said about oxidation is that the issue was resolved at the chip fab some time in 2023, and they’ve claimed it only affected 13th gen parts. There’s no word on which parts number, date ranges, processor code ranges etc. are affected. It seems pretty clear that they wanted the press talking about the microcode update and not the chips that will have the be RMA’d.


  • I’m sure there would be a way to do this with Debian, but I have to confess I don’t know it. I have successfully done this in the past with Clover Bootloader. You have to enable an NVMe driver, but once that’s done you should see an option to boot from your NVMe device. After you’ve booted from it once, Clover should remember and boot from that device automatically going forward. I used this method for years in a home theatre PC with an old motherboard and an NVMe drive on a PCIe adapter.